Video settings + deinterlace , de-interleave , deinleave,

"How to's" and tips and tricks - for all VSO products- not for questions!

Moderators: Maggie, Cougar_II, ckhouston, JJ, alexia, Forum admin

Post Reply
User avatar
Claire
VSO Team Member
Posts: 5913
Joined: Mon Apr 02, 2007 1:39 pm
Location: France
Contact:

Video settings + deinterlace , de-interleave , deinleave,

Post by Claire »

(click here for youtube demo -- in video this version is not yet released - v3.2.1.55)

To modify settings about your videos output format, resolution, and other post processing features click on the
+ Titleset of you video file,
then on + Video. It is recommended to leave all default settings.
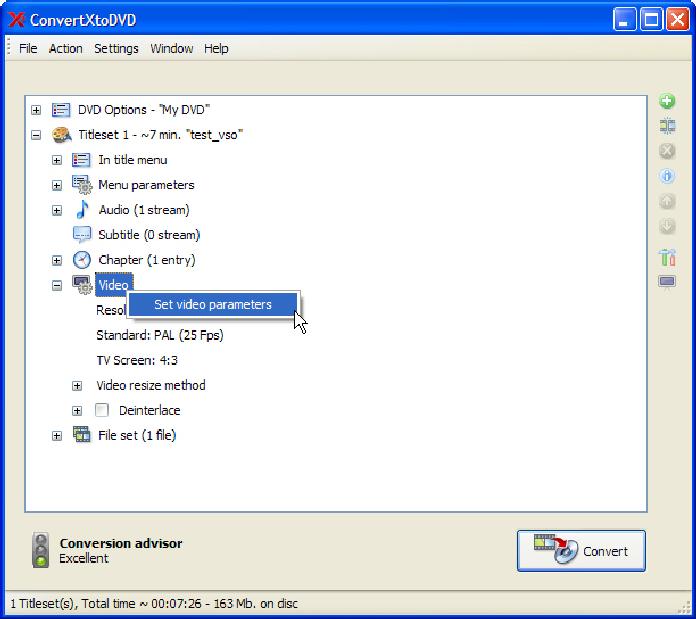
Image
Figure A

Here you will see what this file will be converted to as far as the Resolution, Video format (PAL or NTSC), and TV format (4:3 or 16:9). You can click on any of these to modify these default settings.

+ Video resize method will let you select in drop down list the resize method you would like to apply to this file (again default settings are recommended).
You can also access these settings by right clicking on + Video as shown in figure A, this will open a new window (Figure B). Here you can set the resize method among other settings such as the cropping and padding applied to the video file selected. You can access directly other files in your project in this window by selecting them one at a time in the drop down in the bottom right hand corner or the window.
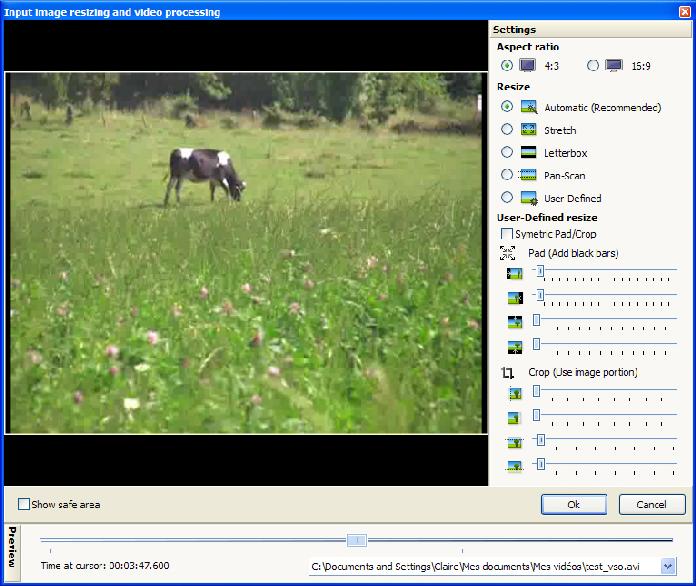
Image
Figure B

+ Deinterlace (if checked) will deinterlace the source file.
In the case that your original file is interlaced we suggest you check the “Deinterlace” option in ConvertXtoDVD to have a better result. Files coming form DV camcoders may need this process. Sometimes, a tool like Virtualdub can be useful to identify if the video file is interlaced or not. Virtualdub works only with avi and mpeg2 files.

For more information on what is deinterlace see Wikipedia

Below are example files deinterlaced and interlaced video files, the screen shots come from Virtualdub.

Image
Figure C - Example deinterlaced video file above


Image
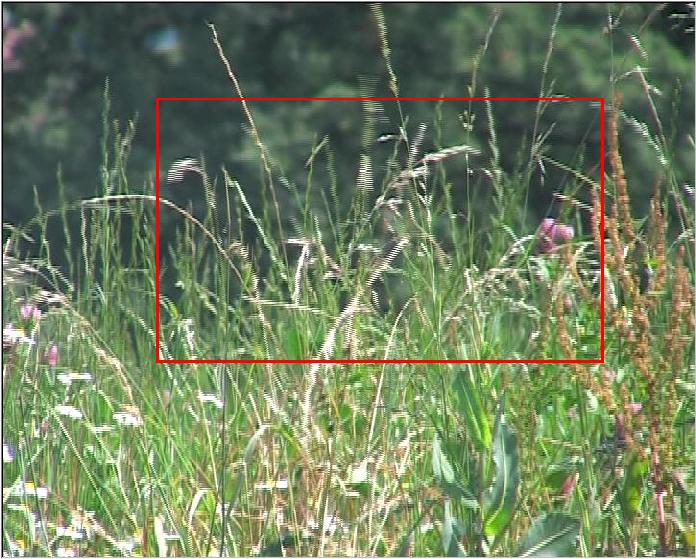
Figure D - Example interlaced video file above
You see artifacts known as "mouse teeth" or "tearing", when the pixels in one frame do not line up with the pixels in the other, forming a jagged edge.

DE-INTERLEAVE (not to confuse with De-Interlace) is the process used for separating audio and video streams from a movie file. it's a synonim of demultiplexing or 'demuxing'.

For more information on what is interlaced and progressive movies, see Wikipedia
Last edited by Claire on Mon Nov 24, 2008 12:37 pm, edited 4 times in total.
ckhouston
VSO Fanatic
Posts: 4590
Joined: Wed Aug 08, 2007 4:12 am

Post by ckhouston »

EDIT NOTE: Earlier versions used the name TV Screen instead of aspect ratio (AR) as used in this discussion and in current versions.

Some basic guidelines are presented here that will hopefully help users understand how to use the video editor shown in Figure B above.

Resize Methods

The effect of different resize methods shown there depends on the relation between the aspect ratio (AR = width / height) of the source video and the converted video. The converted AR is shown at the top in Figure B, note that it can be either 4:3 or 16:9. If you set the AR option in Settings to Automatic, CX2D will set the converted video AR to whichever is closest to the source AR as is normally best.

Letterbox - Pads/adds black bars. They will be added on top and bottom if the source AR > converted AR or on both sides if source AR < converted AR.

Pan-Scan - Crops/cuts part of the video. Cropping is done on both sides if the source AR > converted AR or on top and bottom if source AR < converted AR.

Stretch - Neither pads nor crops. It will stretch a source AR > converted AR vertically thereby making characters taller and thinner. A source AR < converted AR will be streched sideways making characters shorter and fatter. This option is needed only to correct distortion in the rare case of a badly encoded source file.

Automatic - CX2D will use a compromise of both cropping and padding. Some cropping of the sides followed by some padding on top and bottom will be done for source AR > converted AR. Cropping of top and bottom followed by padding of the sides will be done if source AR < converted AR.

User-defined - You can use the sliders at bottom right in the editor to select custom padding and/or cropping to correct a badly encoded source or to achieve a special effect. Each marked division represents 20 pixels for padding and 40 pixels for cropping. You can click on the slide lines to move the slider in small increments. Ten clicks will move the slider one marked division. EDIT NOTE: The latest versions have a redesigned editor with options on the left that are more understandable and much easier to use. Number of pixel corrections are shown in the boxes. You can enter a value for a correction or click the dropdown arrow to reveal a slider bar that can be dragged or clicked on to move the slider.

Note the example source shown in Figure B. It had a souce AR slightly less than 4:3 = 1.333, so CX2D chose 4:3 as the AR to convert to. The resize method is Automatic so CX2D would crop a little from top and bottom and then pad some on the sides as shown by the sliders below.

Letterboxed Widescreen Conversions

The rest of this post will be about cases with source AR > converted AR. The user can hopefully use information above to infer what happens when source AR < converted AR. Experimenting with different sources in the video editor is the best way to learn, but, hopefully, information given here will help.

The image below shows a typical movie originally filmed at the popular AR of 2.35. When that movie was put on a commercial DVD, it was letterboxed to a 16:9 = 1.778 AR by adding the black bars shown there. If that movie were available on the internet for download, it would have been ripped from the DVD and re-encoded to a file format such as avi or mkv that allows higher compression and therefore smaller file size. The person that did the re-encode could have left the black bars in the video (letterboxed version) or removed them (film version).

I would personally Letterbox this movie to a 16:9 AR regardless of the version downloaded - the black bars would be restored for the film version and nothing would need be done for the letterboxed version during conversion. Then it would play the same way as the original commercial DVD would on either a 4:3 or 16:9 TV if the player settings are correct (Letterbox view mode for 4:3 and standard for 16:9).

Problems with Letterboxed Widescreen Conversions

Some people believe, mistakenly IMO, the converted AR should be set to the AR of the TV they will watch the converted video on. And, in some cases, when a user has a problem displaying a 16:9 letterboxed video on a 4:3 TV, usually because of incorrect player setup, they are advised to convert the widescreen source using 4:3 letterbox.

Let's look at how a widescreen letterboxed movie should display on different TVs. Referring again to the image below, the 16:9 letterbox with only the black bars will display on a 16:9 TV as shown. In other words, those same black bars will show on that TV (they are a permanent part of the video). When that video is played on a 4:3 TV with the player correctly set in Letterbox view mode, the player will automatically add additonal black bars represented by the coarse checkerboard areas, the same would be done with a commercial widescreen DVD of the same movie.

Now, if that movie was converted to 4:3 letterbox, permanent black bars equal to the black bars shown in the image plus the coarse checkerboard area would be in the converted video. Such a video will naturally play without a problem on a 4:3 TV even if player setup is incorrect, sometimes promoting the idea that this is the necessary solution for widescreen movies on a 4:3 TV. But nothing has been gained since the two letterboxed conversions will display the same if player setup is correct. And, if the 4:3 letterbox conversion is ever played on a 16:9 TV, the player will have to add black bars on the sides represented by the fine checkerboard areas. The result would be a small movie in the middle of the screen as shown in the image.

Pan-Scan Conversions

Let's look at a few Pan-Scan possibilities.

The red rectangle in the image below represents a 4:3 Pan-Scan conversion of a film version download (source without the black bars included). Such a conversion would be similar to a commercial DVD labeled as "Fullscreen version".

The red dashed rectangle represents a 16:9 Pan-Scan conversion of that download. It would display full screen without black bars on a 16:9 TV but the same could be achieved by zooming a 16:9 letterboxed conversion. It would display roughly the same as the green rectangle on a 4:3 TV with the player in Letterbox view mode - see the following comments about it.

The green rectangle shows a 4:3 Pan-Scan conversion of a letterboxed download with black bars included. The same would be displayed if a 16:9 letterboxed conversion was played on a 4:3 TV with the player in Pan-Scan view mode.

A 16:9 Pan-Scan of the letterboxed version would have no effect of course because the source already has a 16:9 AR.

I can't personally find any benefit for Pan-Scan conversions.
Attachments
2.35 aspect movie.png
2.35 aspect movie.png (140.25 KiB) Viewed 32636 times
Last edited by ckhouston on Wed Oct 01, 2008 12:40 pm, edited 2 times in total.
serix
Posts: 4
Joined: Tue Jun 19, 2007 9:19 pm

Post by serix »

I still don't understand. If a want to preserve the original image without any changes, from a DVD for example, what I have to do ?
ckhouston
VSO Fanatic
Posts: 4590
Joined: Wed Aug 08, 2007 4:12 am

Post by ckhouston »

Automatic for "TV Screen" and Letterbox for Video resize method will give best results for most sources. Automatic and Pan-Scan video resize methods will crop part of your picture which you probably don't want.

Please post in the general forum if you have questions about a particular source file.
Post Reply